

How To Install Wordpress Windows 10
I installed WDS using PowerShell:
get-windowsfeature wds* | install-windowsfeature
In this post i configured DHCP telescopic.New customer machines will use addresses from this scope.
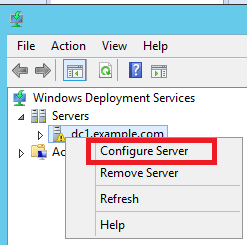
To configure WDS,from server director click WDS on the left and right click on server proper name on the left

In WDS panel,rught click on server name and choose configure server
Check intergated with Active Directory
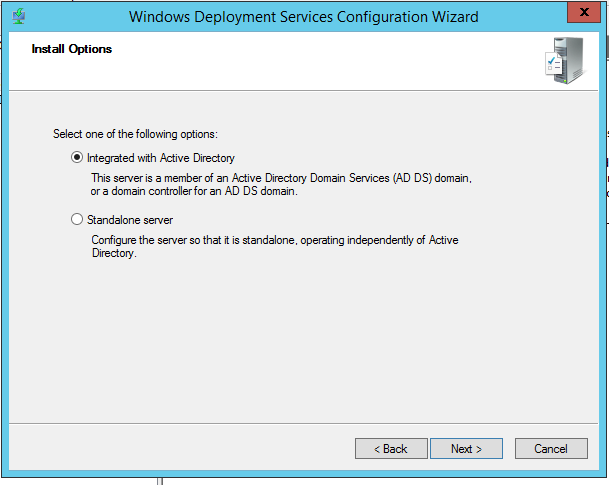
Select location for boot and image files

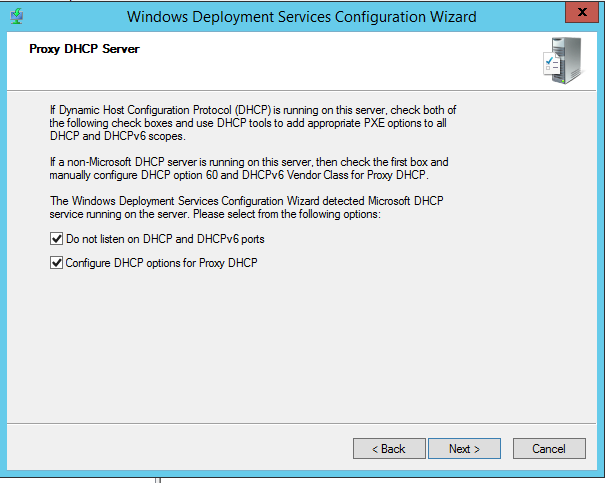
Considering WDS and DHCP are on the aforementioned car,i checked both check-boxes
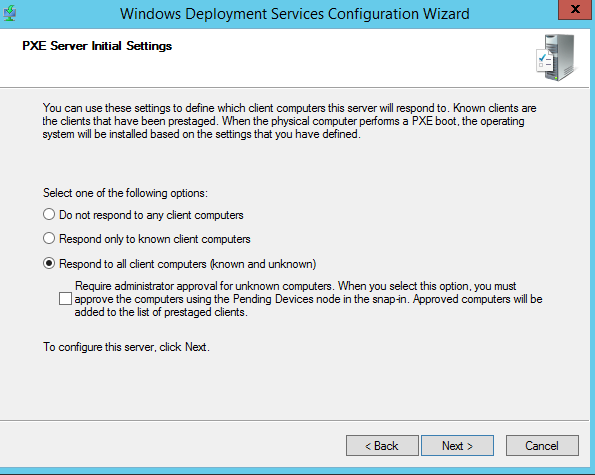
Decide if yous desire to reply to computers objects first created in AD (prestaged) or to any computers on which F12 is pressed (unknown)
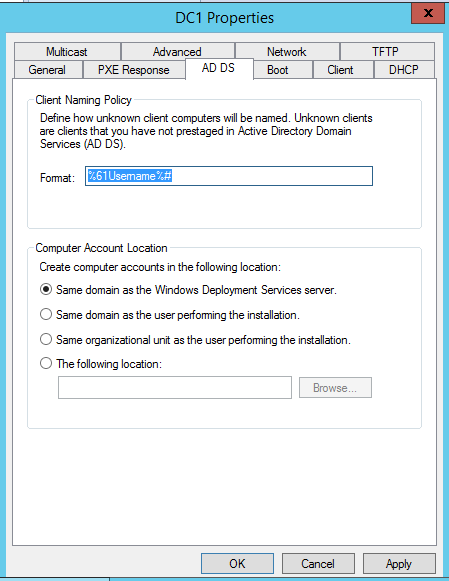
After you click Next,WDS service will start.Right click again on server name in WDS console,click AD DS tab to choose naming convention and where to store domain joined clients.Because for me domain join didn't work,these settings weren't neccessary.
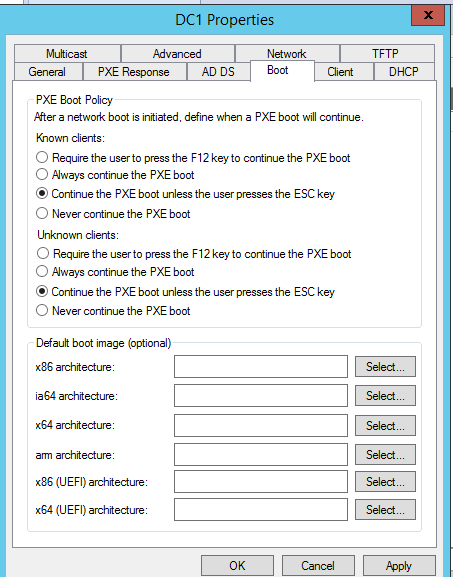
On kicking tab,we can ready if clients can download boot epitome from WDS without demand to press F12 push button
Sysprepping referenced reckoner
Although i specified domain username/password in xml file,i couldn't become win 10 to exist domain member,i tried many,many times,with no success
Fault [0x0b003a] WDS <GetNameInfo failed; status 0x8007276d>[gle=0x0000276d]</>
To overcome this effect i had to add PowerShell script to c:\windows\setup\scripts binder
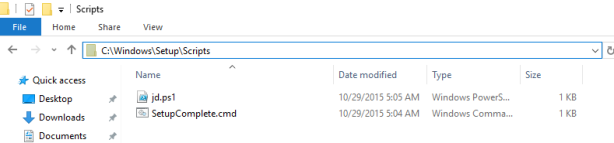
After last restart in installation process,Windows volition serach for whatever script in Scripts folder and if detect any,it volition be executed
SetupComplete.cmd calls jd.ps1 powershell script
powershell.exe -nologo -executionpolicy featherbed -noprofile -file "C:\Windows\Setup\Scripts\jd.ps1"
Past default,powershell doesn't allows running custom PS scripts,that'south why we need to bypass information technology
ps1.ps joins estimator to domain
$domain = "test.com" $password = "Mypass" | ConvertTo-SecureString -asPlainText -Force $username = "$domain\administrator" $credential = New-Object System.Management.Automation.PSCredential($username,$password) $ouPath="OU=workstations,DC=test,DC=com" add together-estimator -Credential $credential -DomainName $domain -OUPath $ouPath -restart -force
Now we need to capture image from this client estimator (and then that content of scripts binder can be bachelor to all newly deployed computers) and upload it to WDS server so it can exist available for deployement.We also can install all neccesarry applications needed for users,and adjust arrangement to comply to company policies.I didn't join reference computer to domain.
SYSPREP is a tool that allows an admin to create a custom install Os image with all the necessary programs preinstalled.
Sysprep is located on %Windir%\System32\Sysprep
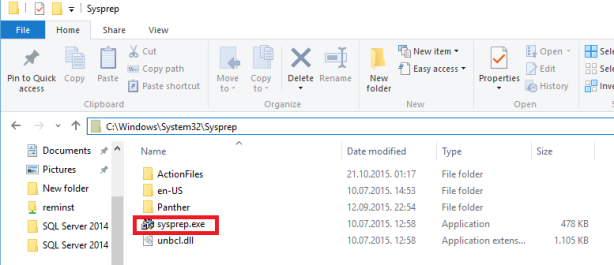
SYSPRER removes system-specific data from a Windows image, including the computer security identifier (SID) which allows you to transfer the image to other systems
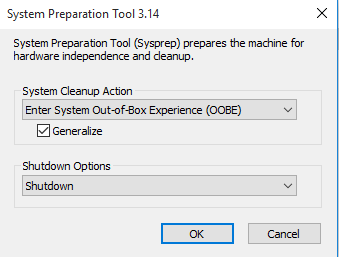
After you click OK,SYSPRER volition remove system-specific info from the system and shutdown information technology
Creating Capture image
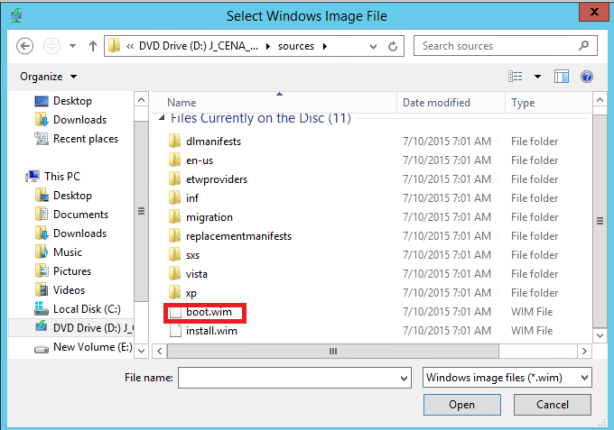
Capture prototype is blazon of kicking paradigm that we boot a client estimator into to capture the operating system as a .wim file.We create capture epitome from boot paradigm (located in setup DVD in source binder)-the Microsoft Windows Preinstallation Environment (Windows PE) epitome.
Windows Preinstallation Environs (Windows PE) is a minimal Win32 operating organization with limited services, built on the Windows kernel. Information technology is used to fix a computer for Windows installation, to copy disk images from a network file server, and to initiate Windows Setup.
In WDS panel,correct click on Kick Image-Add Kicking image
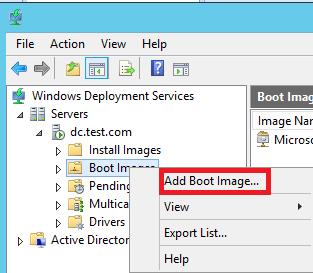
browse to install DVD-source folder-and click Next
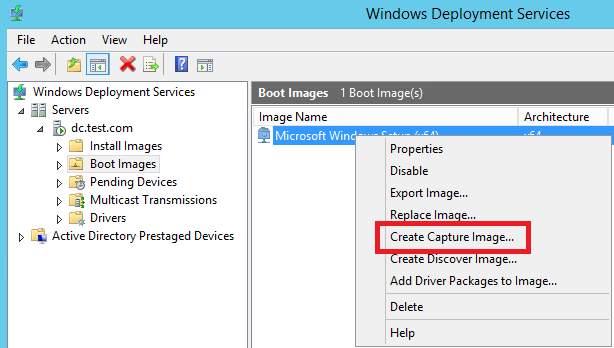
Right click on merely imported boot paradigm and select create capture image
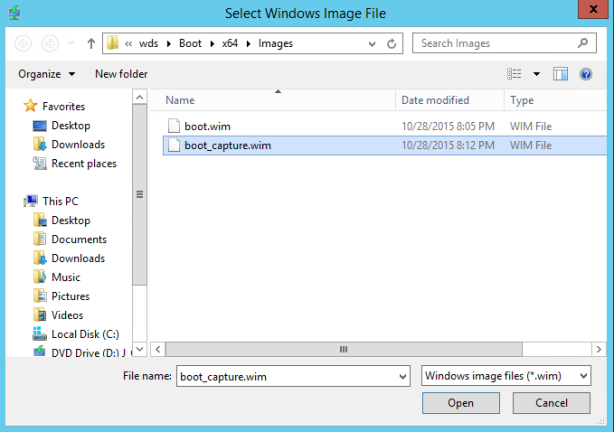
Browse to uploaded boot image (division prepare during WDS initial configuration\Kick\X64\Images

Blazon image and file name

Correct click anywhere on the right and cull Add together Boot image
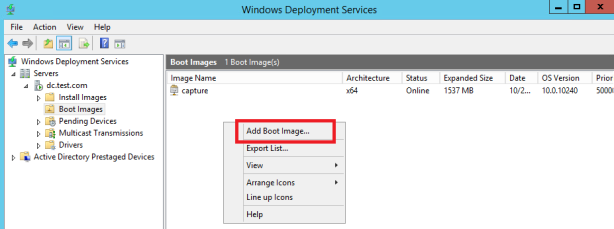
Select image created in previous stride
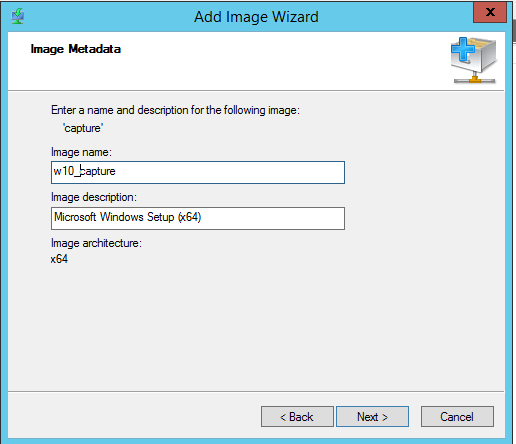
Give information technology name and click next
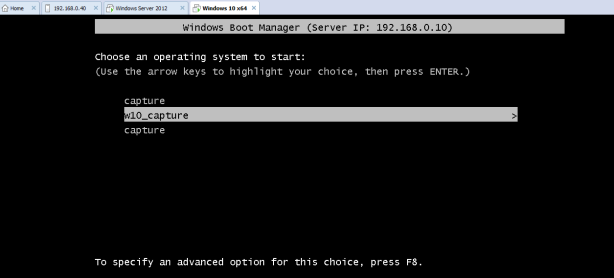
Now,ability on referenced computer (on which nosotros run Sysprep) press F12 and choose captured paradigm we've just created
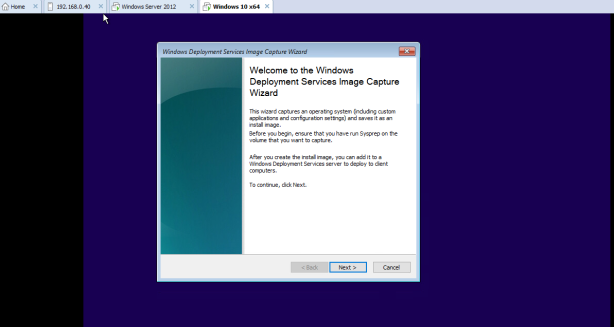
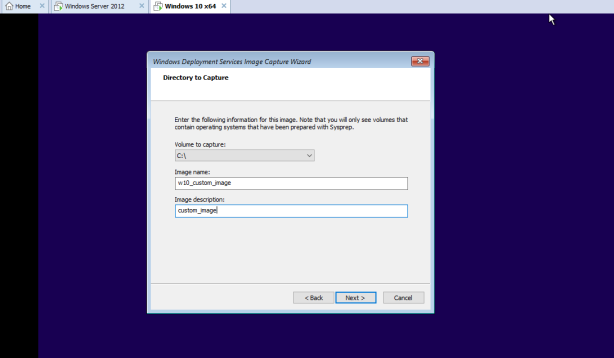
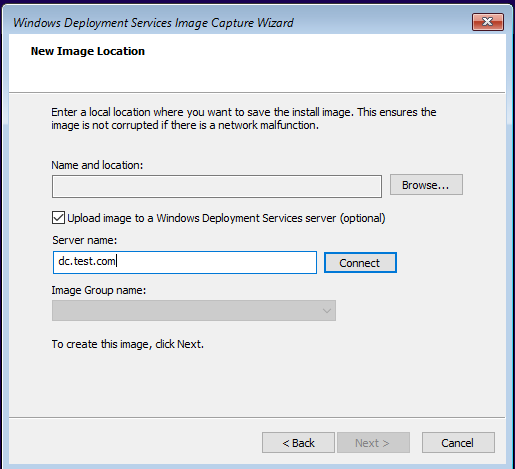
In name and location,browse somewhere on C disk and give epitome descriptive name,check upload prototype to WDS,
by default ImageGroup1 is created and click next,image of referenced client computer,represented in wim file will exist uploaded to WDS.
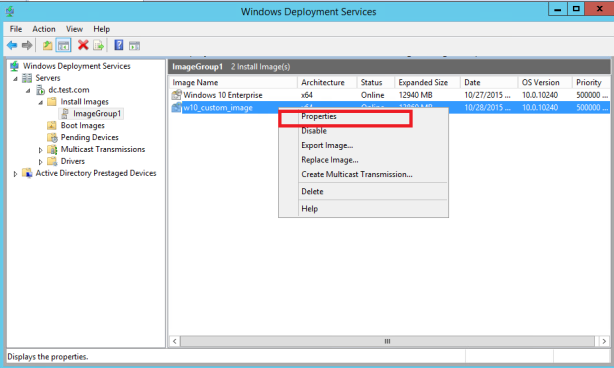
After upload completes (fourth dimension depends on client disk size and network bandwith),in WDS console rigtr click
Install image and choose Add together install epitome
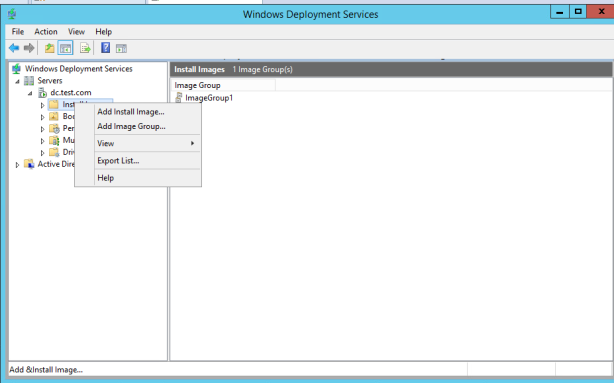
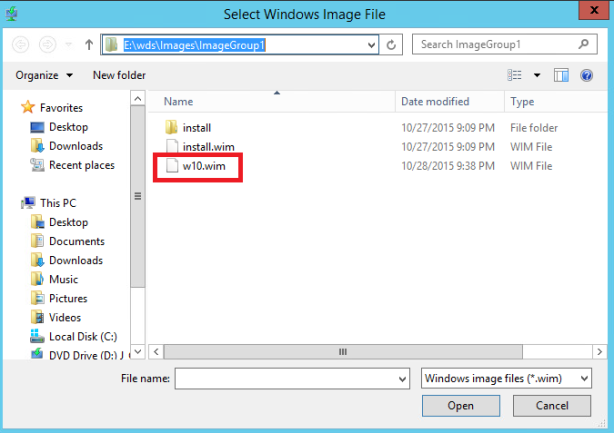
Captured paradigm is stored in Images\ImageGroup binder
Now,when we have imported image of client computer,nosotros tin create xml file which would ensure automatic Win10
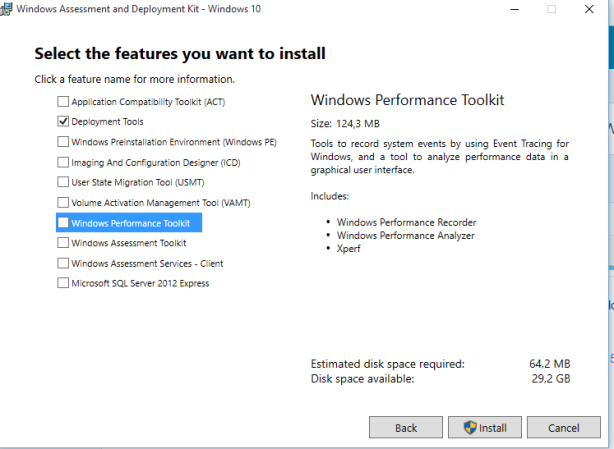
installation.Download Windows Assesement and Deployement Kit to WDS http://download.microsoft.com/download/8/1/9/8197FEB9-FABE-48FD-A537-7D8709586715/adk/adksetup.exe
Select Deployement Tools
In C:\Program Files (x86)\Windows Kits\10\Assesement and Deployement Kit\Deployement Tools\Wsim folder,run imgmgr.exe file
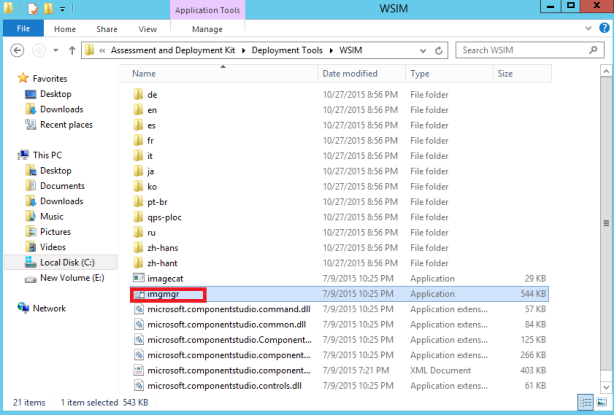
Windows System Image Manager opens,using this tool,we'll create unattended.xml files needed for automated Windows x installation.
Windows System Image Manager (WSIM) uses Windows epitome (.wim) files and itemize (.clg) files to display the available components and packages that can be added to an unattended answer file. Windows images and catalog files contain configurable settings that you tin modify one time the component or package is added to an answer file.
I tried to create itemize file from captured image and WSIM thrown an "unspecified mistake",then i used default wim file from Win 10 install media
I had to re-create install.wim from DVD to local disk
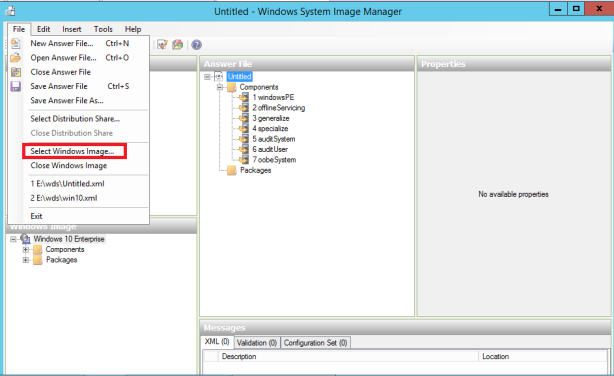
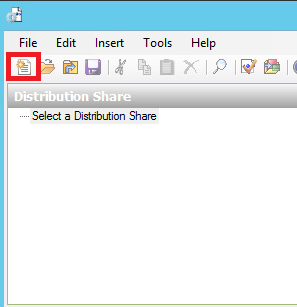
In WSIM click file-Select windows prototype
Browse to install.wim (copied from DVD),y'all'll be promted to create catalog file
A "catalog" file is a binary file that lists the state of all the settings and packages in a Windows image. When a catalog is created, it queries the Windows epitome for a list of all the settings in that epitome

After creating catalog file,click New Reply File
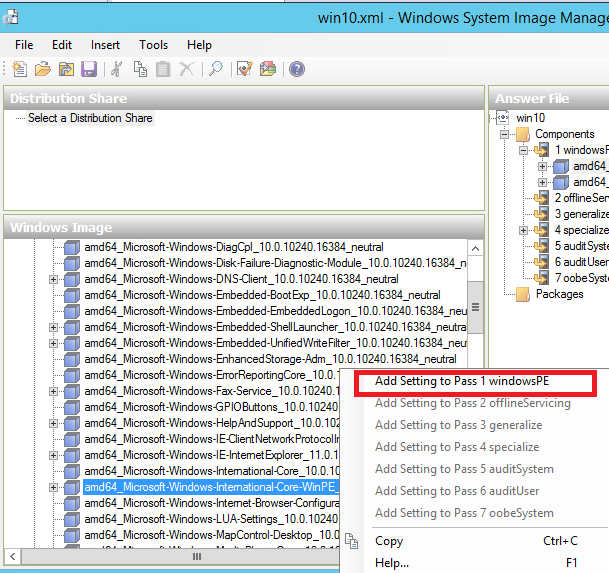
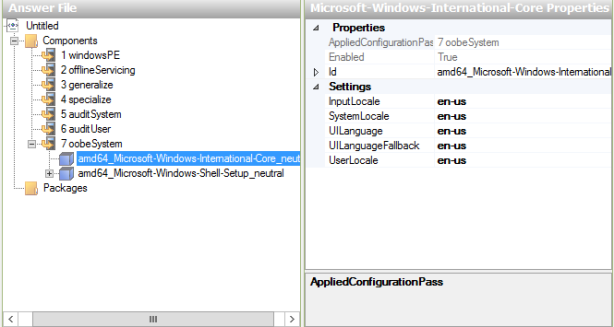
Expand Conponents correct click amd64_Microsoft-Windows-International-Core-WinPE_10.0.10240.16384_neutral
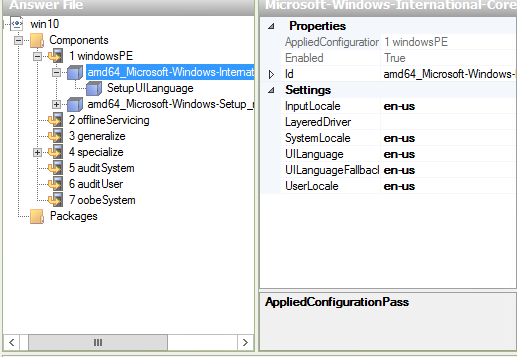
and select Pass1 WindowsPE (used in Windows Preinstallation environs)
Here we set Input,Organisation,Linguistic communication and User locale

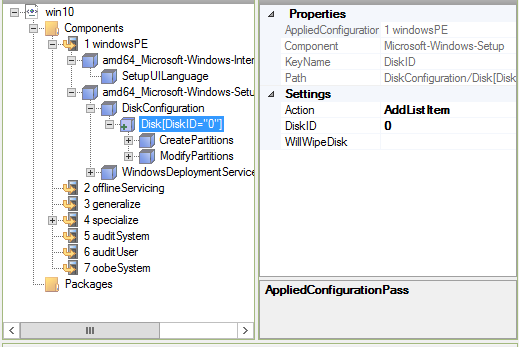
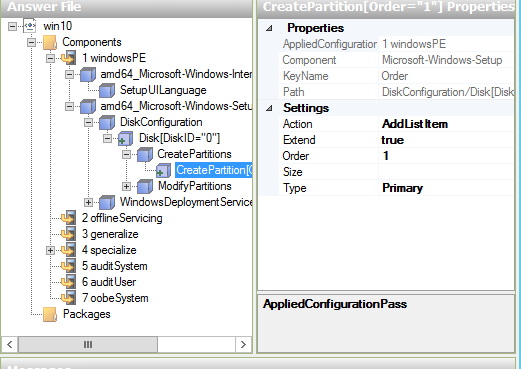
Now select Microsoft-Windows-Setup_10.0.10240.16384_neutral and again select Pass 1 WindowsPE
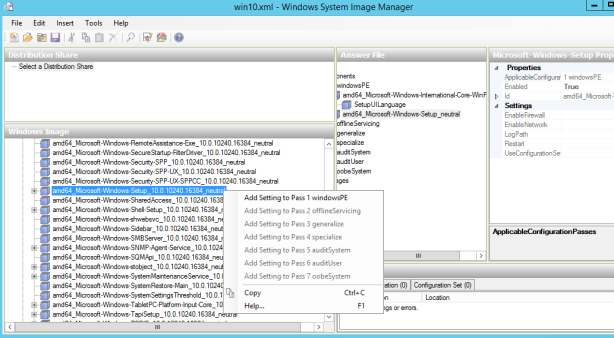
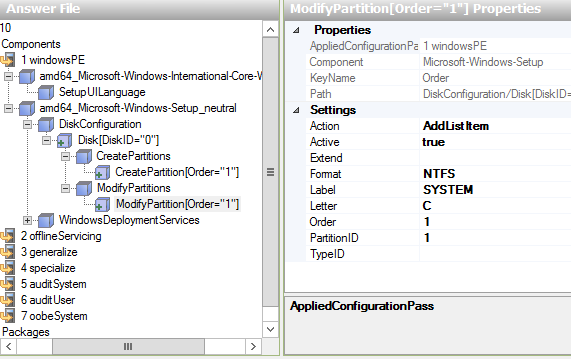
In this phase nosotros configure HDD-division,label and letter
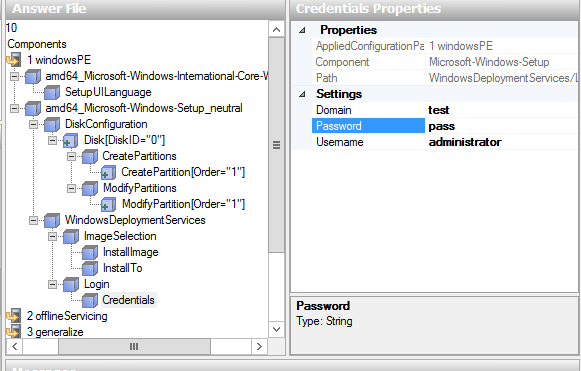
Under Windows deployement service (part of Microsoft-Windows-Setup_10.0.10240.16384_neutral)we specify epitome proper noun,image group and wim filename
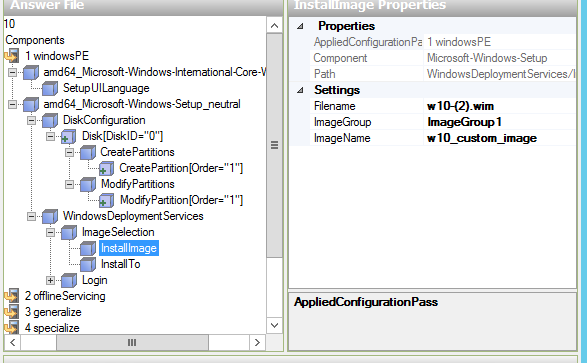
On which disk and partition to install wim image

And WDS credentials
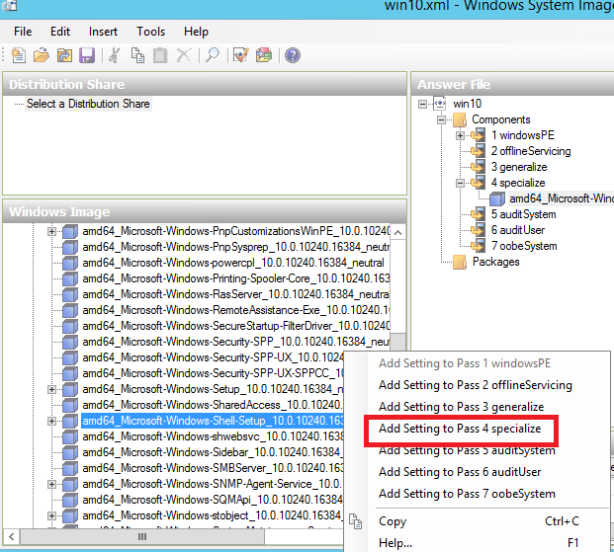
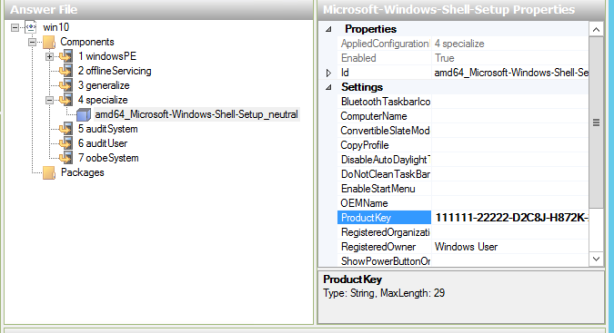
select amd64_Microsoft-Windows-Shell-Setup_10.0.10240.16384_neutral and choosepass 4 specialize (varius arrangement desktop related settings)
Salvage xml file to folder where images are stored.
In WDS panel,right click on WDS server-Client properties and browse to xml file we just created
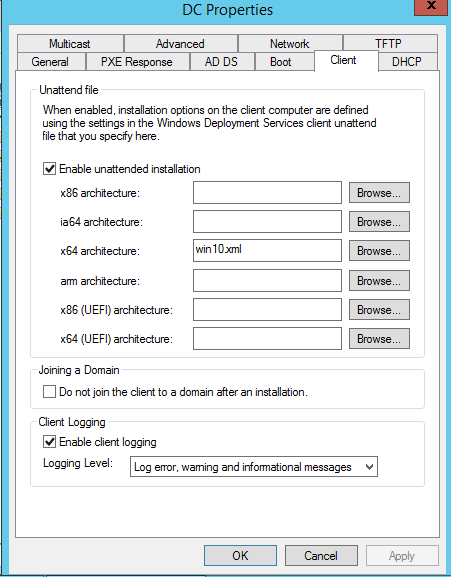
Win10.xml
<?xml version="1.0" encoding="utf-8"?> <unattend xmlns="urn:schemas-microsoft-com:unattend"> <settings pass="windowsPE"> <component name="Microsoft-Windows-International-Cadre-WinPE" processorArchitecture="amd64" publicKeyToken="31bf3856ad364e35" language="neutral" versionScope="nonSxS" xmlns:wcm="http://schemas.microsoft.com/WMIConfig/2002/State" xmlns:xsi="http://www.w3.org/2001/XMLSchema-case"> <SetupUILanguage> <UILanguage>en-us</UILanguage> </SetupUILanguage> <InputLocale>en-the states</InputLocale> <SystemLocale>en-u.s.a.</SystemLocale> <UILanguage>en-us</UILanguage> <UILanguageFallback>en-the states</UILanguageFallback> <UserLocale>en-us</UserLocale> </component> <component name="Microsoft-Windows-Setup" processorArchitecture="amd64" publicKeyToken="31bf3856ad364e35" language="neutral" versionScope="nonSxS" xmlns:wcm="http://schemas.microsoft.com/WMIConfig/2002/State" xmlns:xsi="http://www.w3.org/2001/XMLSchema-case"> <DiskConfiguration> <Disk wcm:action="add"> <CreatePartitions> <CreatePartition wcm:action="add"> <Extend>true</Extend> <Lodge>i</Order> <Type>Primary</Blazon> </CreatePartition> </CreatePartitions> <DiskID>0</DiskID> <ModifyPartitions> <ModifyPartition wcm:activeness="add"> <Active>true</Agile> <Format>NTFS</Format> <Characterization>SYSTEM</Label> <Letter>C</Letter> <Order>1</Gild> <PartitionID>ane</PartitionID> </ModifyPartition> </ModifyPartitions> </Disk> </DiskConfiguration> <WindowsDeploymentServices> <Login> <Credentials> <Domain>examination</Domain> <Password>password</Countersign> <Username>administrator</Username> </Credentials> </Login> <ImageSelection> <InstallImage> <Filename>w10-(two).wim</Filename> <ImageGroup>ImageGroup1</ImageGroup> <ImageName>w10_custom_image</ImageName> </InstallImage> <InstallTo> <DiskID>0</DiskID> <PartitionID>one</PartitionID> </InstallTo> </ImageSelection> </WindowsDeploymentServices> </component> </settings> <settings pass="specialize"> <component proper noun="Microsoft-Windows-Shell-Setup" processorArchitecture="amd64" publicKeyToken="31bf3856ad364e35" language="neutral" versionScope="nonSxS" xmlns:wcm="http://schemas.microsoft.com/WMIConfig/2002/State" xmlns:xsi="http://www.w3.org/2001/XMLSchema-instance"> <TimeZone>Central Europe Standard Time</TimeZone> <ProductKey>NPPR9-FWDCX-D2C8J-H872K-2YT43</ProductKey> </component> </settings> <cpi:offlineImage cpi:source="wim:c:/users/ambassador/desktop/win10.wim#Windows x Enterprise" xmlns:cpi="urn:schemas-microsoft-com:cpi" /> </unattend>
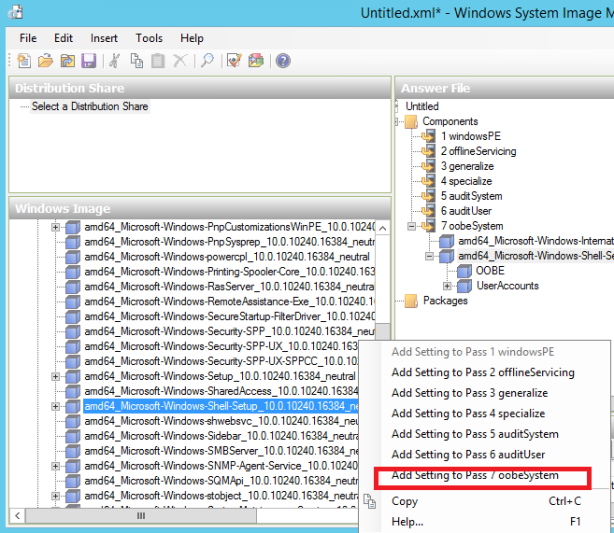
Create new XML file
Select amd64_Microsoft-Windows-International-Core_10.0.10240.16384_neutral and choose
pass 7 oobeSystem: In this configuration pass, settings are practical before the LogOn screen appears

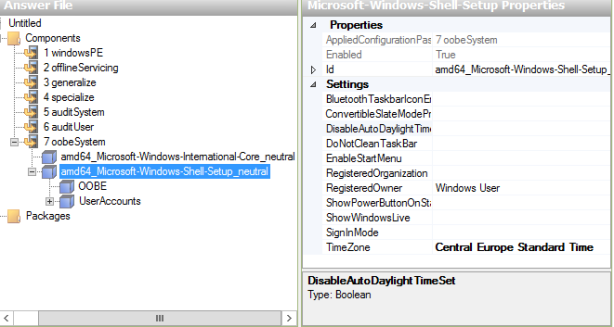
Over again,select amd64_Microsoft-Windows-Shell-Setup_10.0.10240.16384_neutral and choose
laissez passer seven oobeSystem
Here you lot can set Time Zone
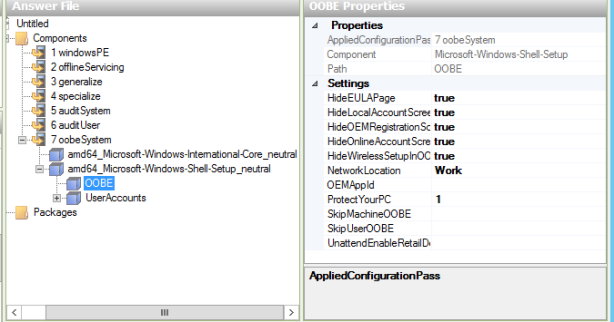
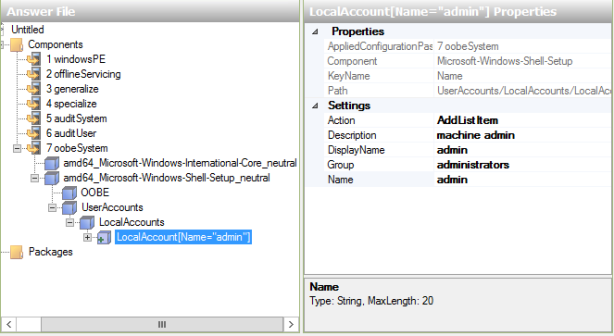
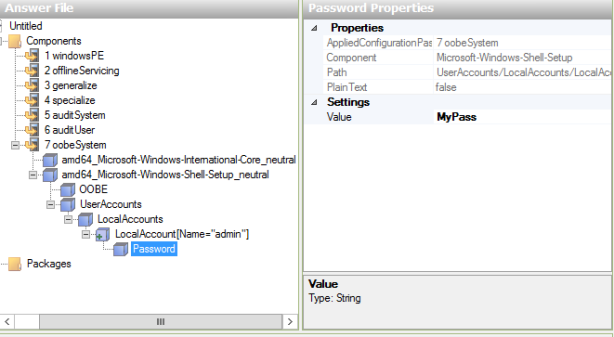
Setting Local Admin Account
Save file and assign it to captured image

deploy.xml
<?xml version="ane.0" encoding="utf-8"?> <unattend xmlns="urn:schemas-microsoft-com:unattend"> <settings pass="oobeSystem"> <component name="Microsoft-Windows-International-Cadre" processorArchitecture="amd64" publicKeyToken="31bf3856ad364e35" language="neutral" versionScope="nonSxS" xmlns:wcm="http://schemas.microsoft.com/WMIConfig/2002/Land" xmlns:xsi="http://www.w3.org/2001/XMLSchema-instance"> <InputLocale>en-usa</InputLocale> <SystemLocale>en-us</SystemLocale> <UILanguage>en-usa</UILanguage> <UILanguageFallback>en-us</UILanguageFallback> <UserLocale>en-usa</UserLocale> </component> <component proper noun="Microsoft-Windows-Crush-Setup" processorArchitecture="amd64" publicKeyToken="31bf3856ad364e35" language="neutral" versionScope="nonSxS" xmlns:wcm="http://schemas.microsoft.com/WMIConfig/2002/Land" xmlns:xsi="http://www.w3.org/2001/XMLSchema-instance"> <UserAccounts> <LocalAccounts> <LocalAccount wcm:action="add"> <Countersign> <Value>UABhAHMAcwB3ADAAcgBkADAANgBQAGEAcwBzAHcAbwByAGQA</Value> <PlainText>false</PlainText> </Password> <Description>machine admin</Description> <DisplayName>admin</DisplayName> <Group>administrators</Group> <Name>admin</Name> </LocalAccount> </LocalAccounts> </UserAccounts> <OOBE> <HideEULAPage>truthful</HideEULAPage> <HideLocalAccountScreen>true</HideLocalAccountScreen> <HideOEMRegistrationScreen>true</HideOEMRegistrationScreen> <HideOnlineAccountScreens>true</HideOnlineAccountScreens> <ProtectYourPC>i</ProtectYourPC> <HideWirelessSetupInOOBE>truthful</HideWirelessSetupInOOBE> <NetworkLocation>Work</NetworkLocation> </OOBE> <TimeZone>Central Europe Standard Fourth dimension</TimeZone> </component> </settings> <cpi:offlineImage cpi:source="wim:c:/users/ambassador/desktop/win10.wim#Windows 10 Enterprise" xmlns:cpi="urn:schemas-microsoft-com:cpi" /> </unattend>
Burn down off workstation and installation should go along without user intervention
Source: https://geekdudes.wordpress.com/2015/10/30/unattended-install-windows-10-using-windows-deployement-service-on-win-server-2012-r2/
Posted by: goldmanyouss1951.blogspot.com
0 Response to "How To Install Wordpress Windows 10"
Post a Comment